ราคาต่ำสุด
THB 0.00
พร้อมส่ง
SKU
FORMTRACER Avant C3000/4000
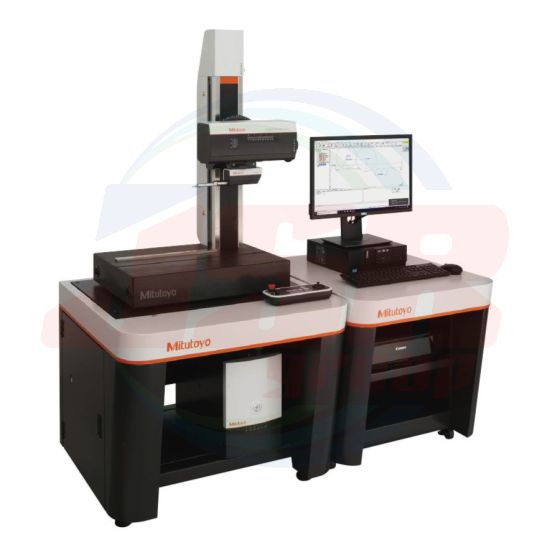
High-performance Contour Measuring Instrument
FORMTRACER Avant C3000/4000
Digital contour measuring instruments with a high-speed drive and various time-saving functions for efficient measurement.
Measuring range (X axis): 100 mm, 200 mm
Measuring range (Z1 axis): 60 mm
| Order No. | FTA-S4C3000 | FTA-H4C3000 | FTA-W4C3000 | FTA-L4C3000 | FTA-S8C3000 | FTA-H8C3000 | FTA-W8C3000 | FTA-L8C3000 | ||
| FTA-S4C4000 | FTA-H4C4000 | FTA-W4C4000 | FTA-L4C4000 | FTA-S8C4000 | FTA-H8C4000 | FTA-W8C4000 | FTA-L8C4000 | |||
| Z1 axis (detector unit) |
Measuring range | 60 mm (±30 mm in horizontal orientation) | ||||||||
| Scale unit | Arc scale | |||||||||
| Resolution | C3000: 0.04 μm C4000: 0.02 μm | |||||||||
| Straightness (when the X axis is horizontal) |
0.8 μm / 100 mm | 2 μm / 200 mm | ||||||||
| Accuracy (20℃) |
C3000 | X axis | ± (0.8+0.01L) μm L = Measuring length (mm) Wide range: 1.8 μm / 100 mm Narrow range:1.05 μm / 25 mm |
± (0.8+0.015L) μm L = Measuring length (mm) Wide range: 3.8 μm / 200 mm Narrow range: 1.2 μm / 25 mm |
||||||
| Z1 axis (detector unit) |
± (1.2+|2H|/ 100) μm H = Measurement height from the horizontal position (mm) | |||||||||
| C4000 | X axis | ± (0.8+0.01L) μm L = Measuring length (mm) Wide range: 1.8 μm / 100 mm Narrow range:1.05 μm / 25 mm |
± (0.8+0.015L) μm L = Measuring length (mm) Wide range: 3.8 μm / 200 mm Narrow range: 1.2 μm / 25 mm |
|||||||
| Z1 axis (detector unit) |
± (0.8+|2H|/ 100) μm H = Measurement height from the horizontal position (mm) | |||||||||
| Stylus up/down motion | Arc movement | |||||||||
| Measuring direction | Both pulling and pushing directions | |||||||||
| Measuring face direction | Downward or upward | |||||||||
| Measuring force | C3000 | 30 mN | ||||||||
| C4000 | 10, 20, 30, 40, 50 mN (direction switch from FORMTRACEPAK) | |||||||||
| Stylus traceable range (when using standard accessory stylus) |
C3000 | One-sided cut stylus SPH-71: Ascent 77° Descent 83° (according to surface texture) | ||||||||
| C4000 | One-sided cut stylus SPH-71: Ascent 77° Descent 83° (according to surface texture) Double-sided cone stylus SPHW-56: Ascent 74° Descent 72° (according to surface texture) |
|||||||||
| Stroke limit function | Range: -29 mm - +29 mm Positioning accuracy range: ±1 mm |
|||||||||
| X axis (drive unit) measuring range | 100 mm | 200 mm | ||||||||
| Scale unit | X axis | Ultra-high precision linear encoders | ||||||||
| Z2 axis (column) | ABS linear encoder | |||||||||
| Resolution | X axis | 0.05 μm | ||||||||
| Z2 axis (column) | 1 μm | |||||||||
| X axis inclination angle | ±45° | |||||||||
| Z2 axis (column) travel range | 300 mm | 500 mm | 700 mm | 300 mm | 500 mm | 700 mm | ||||
| Drive speed | X axis | Software: 0 - 80 mm/s Remote box operation: 0 - 40 mm/s |
||||||||
| Z2 axis (column) | Software: 0 - 30 mm/s Remote box operation: 0 - 30 mm/s |
|||||||||
| Measuring speed | 0.02, 0.05, 0.1, 0.2, 0.5, 1.0, 2.0, 5.0, 10, 20, 30 mm/s* | |||||||||
| Detector replacement | Hot swap feature allows for replacement without turning the controller power off (initialization of contour detector required) Employs tool-less replacement mechanism (using thumb-turn knob) |
|||||||||
| Base size (W×D) | 600×450 mm | 1000×450 mm | 600×450 mm | 1000×450 mm | ||||||
| Base material | Granite | |||||||||
| External dimensions (mm) |
Main unit |
W | 759 | 759 | 1159 | 1159 | 769 | 769 | 1169 | 1169 |
| D | 482 | 482 | 482 | 492 | 482 | 482 | 482 | 492 | ||
| H | 966 | 1166 | 1176 | 1430 | 966 | 1166 | 1176 | 1430 | ||
| Controller | W221×D472×H346 | |||||||||
| Remote box | W248×D62×H102 | |||||||||
| Mass (kg) | Main unit | 140 | 150 | 220 | 270 | 140 | 150 | 220 | 270 | |
| Controller | 14 | |||||||||
| Remote box | 0.9 | |||||||||
| Accuracy guaranteed temperature range | 19 - 21℃ | |||||||||
| Accuracy guaranteed temperature change over time (max) | 2.0℃ / 8 h | |||||||||
| Operating temperature range | 5 - 40℃ (within ±1℃ temperature fluctuation on calibration and measurement) | |||||||||
| Operating humidity range | 20 - 80%RH (with no condensation) | |||||||||
| Storage temperature range | -10 - 50℃ | |||||||||
| Storage humidity range | 5 - 90%RH (with no condensation) | |||||||||
| Communication interface | USB | |||||||||
| Power supply | 100 - 120 V, 200 - 240 V ±10%, 50/60 Hz | |||||||||
| Power consumption | 400 W | |||||||||
* Recommended that measurements be conducted at measurement speeds no faster than 5 mm/s.
(If the measurement speed is too fast, coupled with high surface roughness, this may cause the stylus to chip or compromise measurement accuracy.)
| แบรนด์สินค้า | MITUTOYO |
|---|

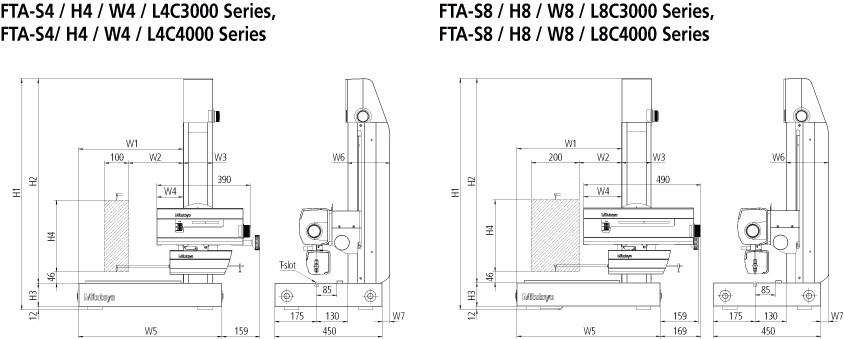
Unit : mm
|
X axis |
Order No. | W1 (mm) |
W2 (mm) |
W3 (mm) |
W4 (mm) |
W5 (mm) |
W6 (mm) |
W7 (mm) |
H1 (mm) |
H2 (mm) |
H3 (mm) |
H4 (mm) |
|
| 3000 Series | 4000 Series | ||||||||||||
| 100 mm | FTA-S4C3000 | FTA-S4C4000 | 438 | 228 | 124 | 110 | 600 | 177 | 32 | 966 | 854 | 100 | 300 |
| FTA-H4C3000 | FTA-H4C4000 | 438 | 228 | 124 | 110 | 600 | 177 | 32 | 1166 | 1054 | 100 | 500 | |
| FTA-W4C3000 | FTA-W4C4000 | 838 | 228 | 124 | 110 | 1000 | 177 | 32 | 1176 | 1054 | 110 | 500 | |
| FTA-L4C3000 | FTA-L4C4000 | 825 | 215 | 150 | 97 | 1000 | 187 | 42 | 1430 | 1308 | 110 | 700 | |
| 200 mm | FTA-S8C3000 | FTA-S8C4000 | 438 | 228 | 124 | 110 | 600 | 177 | 32 | 966 | 854 | 100 | 300 |
| FTA-H8C3000 | FTA-H8C4000 | 438 | 228 | 124 | 110 | 600 | 177 | 32 | 1166 | 1054 | 100 | 500 | |
| FTA-W8C3000 | FTA-W8C4000 | 838 | 228 | 124 | 110 | 1000 | 177 | 32 | 1176 | 1054 | 110 | 500 | |
| FTA-L8C3000 | FTA-L8C4000 | 825 | 215 | 150 | 97 | 1000 | 187 | 42 | 1430 | 1308 | 110 | 700 | |
เขียนรีวิวสินค้าของคุณเอง


