Marketing JSR2
-
May 06, 2026
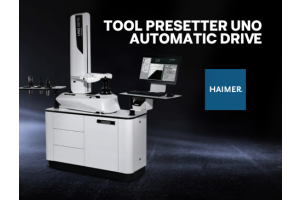
Tool presetter UNO automatic drive
Quality pass
- Automatic tool measurement in 3 axes
- Motorized fine adjustment
- Release-by-Touch
- Repeatability ± 2 μm
- Spindle runout 2 µm
With it´s fully automated measurement operation, UNO automatic drive, the high-end model of the UNO series is fully independent of the operator and can be used with minimal user expertise.
This guarantees maximum quality and time saving, even with complex tools on several planes.
Tool presetter UNO automatic drive
Description Norm: Haimer Value: metric/inch Maximum tool diameter Ø 15.748 inch Maximum snap gauge tool diameter 3.937 inch Maximum tool length on Z-axis 15.748 inch Maximum tool weight G 66.15 lbs Mass (weight) M 66.15 lbs
Equipment
Image processing system
Automatic tool measurement in 3 axes
SK50 ultra-high precision spindle, autofocus
Motorised fine adjustment
24" touch screenMotorized indexing 4 x 90° and 3 x 120°
Spindle brake
Vacuum clamping
Premium base cabinet incl. storage
-
April 27, 2026
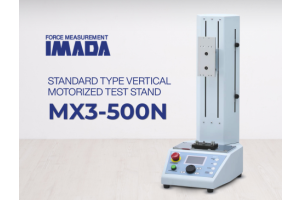
Standard Type Vertical Motorized Test Stand MX3-500N
- Motorized Test Stand with a stable force application capacity of up to 500N
- Enable highly reproducible tests with uniform test conditions in speed/force direction
- Possible to control operation by force value (load keep, etc.)
- Dedicated downloadable software included for setting/saving/loading test conditions
Features High measurement reproducibility
- Enables Stable force capacity of up to 500N
- Stable uniformity in force directions and test speed
- High rigidity with a low deflection design.Cater to a wide range of measurement types
- Repeated durability test by setting the number of test cycles
- Durability test by maintaining the specific force value (*2)
- The table designed to cater to a various attachment.Simple Operation
- Display in English or Japanese languages
- Simple test condition settings with dial and buttons operation
- Clear display of test settings and status for immediate
confirmation.
- Software - Motorized Test Stand with a stable force application capacity of up to 500N
-
April 24, 2026
RUN-OUT GAUGE SYSTEM
For those who handle a large number of cylindrical parts (small diameter)
For those who use V-Blocks
For those with variability in measurement by workers
If any of those apply to you, why not install our
RUN OUT GAUGE SYSTEM.
■ Easy to measure concentricity by mounting your current indicator.
■ Three base length, three rollers and three carriers (incl. no carrier type), total 21 product configurations available.
■ Up to 2μ accuracy. Highly accurate measurement is possible. *Up to 3μm accuracy when slit roller (for small diameter).
■ Smooth measurement with grip handle and timing belt & pulley operation system.
■ Carrier with angle fine adjustment for easy zero-setting of measuring instruments.
Free movement in Z-direction enables measurement at the optimum position.
■ Equipped with work retainer for holding front and rear of workpiece and to enable measurement of axial run-out.<Configurations>
SPECIFICATIONS
●Accuracy
Slit/ Flat roller type: Within -
April 20, 2026
Portable Surface Roughness Tester Surftest SJ-220
Intuitive Usability,Great Scalability
A portable surface roughness tester designed like a hand tool for easy on-site use
The SJ-200 series of portable surface roughness measuring instruments that has contributed to industrial development and technological progress through precision measurements, has evolved further still.While maintaining excellent portability and ease of use on-site, it also provides touch screen functionality for intuitive operability. Equipped with a built-in battery, it can perform measurements in environments where power is not available and can be used approximately 1000 times on a full charge.Cableless and paperless work is made possible by using the U-WAVE-TIB, a Mitutoyo wireless data transmitter.This is a user-friendly device that provides compatibility and versatility to meet diverse manufacturing needs.
User-friendly
Simple and easy for anyone to use.Convenient portability and onetouch measurement
-
April 10, 2026
Set Torque Screwdriver
Torque Screwdriver for TORX® Single Set, 25mm+50mm Bits
Standard Set Torque Screwdriver
TSD-06
Sloky straight handle torque screwdriver
Sloky torque screwdriver with straight handle as smallest Torque Screwdriver in the world. Due to the advantage of our torque adapter, we don't need to utilize the space in the handle. Any handle with 1/4" (6.35H) hole willl be good for Sloky torque adapter. This set is most commonly accepted one and good for small torque. Straight handle with 1 torque adapter (0.6 ~ 3Nm) and 1 pc each of 25mm and 50mm bit (Torx, Torx Plus and Hex) avaliable. User friendly for CNC cutting tool of machining, turning and milling. (TORX® and TORX PLUS® both are registered trademarks of Acument global technologies LLC.)
Features
Let CLICK Tell You When the Torque is Reached!
Quick release! Simply pull the bit outward to change new bit.Perfect positioning in the bits.
A Secure hold, you’ll never second-guess; a precision torque tool is only as
-
April 09, 2026
ASPV mini Polish Mill V type ASPV mini
ASPV Polish Mill V type ASPV
Expanded lineup with a focus on large-diameter bodies, precision bodies and insert grades.
Features and Series Product Positioning Addresses challenges posed by structural component finishing
Issue 01 We want to reduce cycle times, but increasing cutting conditions reduces accuracy. Proposed solutions
High precision × fine pitch concept
Point! Combines high precision ground inserts with fine-pitch body design to ensure both accuracy and productivity. Point! Reduces rework operations and significantly reduces finishing time.
Issue 02 Different tools are required for various machining locations and depths.Typically, this calls for a large number of tools. Proposed solutions
Supports a wide range of machining requirements.
Point! High flexibility in machining methods makes it possible to machine a wide range of locations. Interference avoidance variations
Point! Extensive lineup reduces risk of interference -
April 06, 2026
PRECISION MICRO SCREWDRIVER
Precision Screwdriver No TD-51 +000/+0000
Precision Screwdriver Set No.TD-56S +0/+00/+000/+0000/-0.9/-0.7
Precision Screwdriver Series for Ultra Micro Screws
The cushion grip is adjustable for comfortable fastening. Perfect!
for such micro screws!!
World's smallest screw with M0.5 size
according to Us
For the maintenance of precision devices such as smartphones.
Precision Screwdriver / Precision Screwdriver Set
Micro tip
+000 Shank dia. 1.6mm
+0000 Shank dia. 1.4mm
Light touch makes quick and stable fastening possible.
Rust-resistant stainless steel
Cushion grip, adjustable, easy to operate Knurled Grip design specifically suitable for adjustment work Speed Fastening Precision Fastening Both cushion grip and knurled section should be used for quick fastening. Press the cushion grip firmly and make a rotation Precision Screwdriver
Precision Screwdriver Set -
March 17, 2026
Cordless Driver Drill
12Vmax Cordless Driver Drill 10 mm (3/8") 30 N·mMechanical 2-speed transmission
20 Torque Settings
10mm (3/8”) Single-sleeve keyless chuck (DF331D, HP331D)
Single LED job light with pre-glow and afterglow functions
Ergonomic handle for driver-drill applications
A ln order to provide maximum thrust to the bit, the top back of the handle is ergonomically contoured and widened according to the U-shape formedbetween user’s thumb and index finger.
B Ribbed rubber grip enables all finger tips to hold the handle securely against the strong rotational force of counter torque even in single-handed operation.
-
March 17, 2026
UBURR® – โซลูชันลบคมด้วย CNC สำหรับขอบรูทั้งด้านหน้าและด้านหลัง
ขอแนะนำ NOGA MT UBURR – กลุ่มเครื่องมือลบคมที่ออกแบบมาเพื่อเพิ่มประสิทธิภาพของกระบวนการลบคมอัตโนมัติ ประกอบด้วยองค์ประกอบสำคัญ 2 ส่วน ได้แก่
- ใบมีดตัดที่มีความแม่นยำสูง พร้อมรูปทรงเรขาคณิตเฉพาะตัว และรูปแบบคายเศษหลายรูปแบบให้เลือกตามขนาดงาน
- ด้ามจับเครื่องมือแบบ MT DURASHIELD ที่มีเอกลักษณ์เฉพาะตัว ซึ่งไม่เคยมีมาก่อนในอุตสาหกรรมเครื่องมือตัดโลหะ
UBURR สร้างมาตรฐานใหม่ด้านประสิทธิภาพและคุณภาพในการลบคม
ในวงการกลึงและการผลิต เครื่องมือลบคมมีบทบาทสำคัญอย่างยิ่ง ช่วยให้มั่นใจได้ว่ารูที่เจาะนั้นสะอาด เรียบ และปราศจากคมที่ไม่พึงประสงค์ ซึ่งอาจส่งผลต่อประสิทธิภาพหรือความสวยงาม
ที่ NOGA MT วิสัยทัศน์ของเราชัดเจน: คือการส่งมอบความเป็นเลิศที่ไม่มีใครเทียบได้ ผ่านผลิตภัณฑ์คุณภาพสูงสุดที่ออกแบบโดยผู้เชี่ยวชาญที่มีทักษะ และผลิตจากวัสดุที่ดีที่สุดที่โลกของเรามีให้ มาร่วมกับเราในการกำหนดนิยามใหม่ของการลบคมด้วย UBURR
UBURR Advanced Features:
ประสิทธิภาพการทำงาน Operational Excellence
- ระบบอัตโนมัติที่มีประสิทธิภาพ: บรรลุการผลิตที่ราบรื่นด้วยการลบคมอัตโนมัติแบบผ่านครั้งเดียวทั้งพื้นผิวด้านหน้าและด้านหลังของรู
-
March 16, 2026
GAP CALIPER
Available in 9 Different Specifications
Digital and Analog
Digital Display
Analog Scale
Arms and Probes
Stainless Steel Probe Straight Arm
Stainless Steel Probe Swivel Arm
Nylon Probe Straight Arm
Digital and Analog
4 Flat Points
3 Ball Points
Flat
Resin / Flat
Biuetooth BOX
■Model No. DTW-DG01
Bluetooth Adaptor : Bluetooth LE * ver.4.0~ (HOGP profile)
●Transmitting Distance : Range ~30 m ※class : 2
●Battery : Lithium Polymer ( 350 mAh )
●Running Time : Aprx. 17 hours ( 250 datas per hour )
●Recharging Time : Aprx. 100 minutes
●Size : L35 x W57 x H17.5 mm / Weight : 45 g< Accessories >
USB data cable (20cm), USB recharge cable (1m), Caliper board, Insturction manual and Dadicated software (B LOG)Attach the Bluetooth BOX to Digital Gap Caliper for wirelessdata transmission.
DIGITAL GAP CALIPER and ANALOG GAP CALIPER
4 Different Bottom Bases 4 Flat Points
●Capable to measure the location with radius curves and ditches/ grooves
●Can be measured

